1. Overview
Learning Tools Interoperability® (LTI®) allows Blackboard to connect with external learning tools such as Inspera easily and securely. The connection supports Blackboard by passing information in a standards-based way to Inspera. These include the role of that user (instructor or candidate) and the course which they launched the tool from. It can create user accounts in the tool upon launch as well, acting as both a registration and single sign-on in one easy workflow. Additionally, LTI Advantage / 1.3 supports returning marks from Inspera to the Blackboard gradebook.
There are a few steps to configure Blackboard:
- Register the Application within Blackboard Developer Portal
- Configure the Manage Placements in Developer Portal
- Registering the platform (refers to the application wanting to use the functionality provided by the tool) in Blackboard.
2. External Tool Registration and Configuration
The security model for LTI 1.3 and LTI Advantage services is based on OAuth 2.0 and OpenID Connect. This differs from previous versions of the LTI standard, which used OAuth 1.0. Practically, this means the Tool and Platform must register with one another ahead of time before activities and courses can be accessed from the platform. Registration happens only once manually, when setting up a link between the tool and a platform, and is essentially a security contract between those two respective systems.
Important information when copying and pasting URLs
When copying and pasting URLs, ensure there are no whitespaces before or after; extra whitespaces can cause broken links, access errors, and break the LTI setup.
-
Administrator - Register Application within Blackboard Developer Portal
The user needs to register the application on the Blackboard Developer Portal.
This is available for Administrators in Blackboard.
- Register an application within the Blackboard Developer Portal: https://developer.blackboard.com
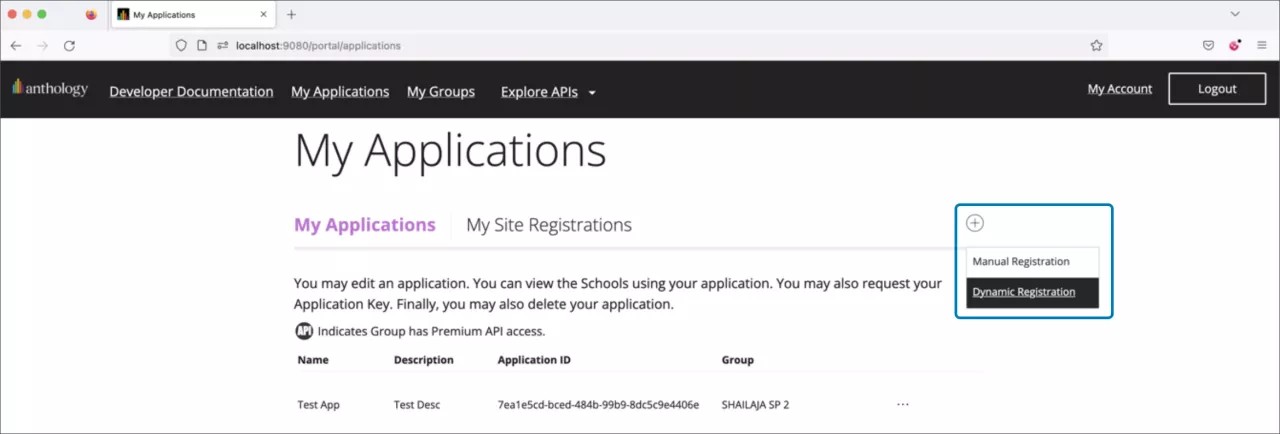
- Click on the My Applications link [i] from the menu bar then click on the + [ii] icon to register the application. You can choose one of the following options
- Dynamic Registration: When you enter your URL, the tool will register your data automatically.
-
Manual Registration: Enter your registration information manually.
-
Dynamic Registration
- Select Dynamic Registration.
-
Enter the tool registration URL.
-
Manual Registration
-
Select the Manual Registration [i] link from the dropdown.
-
NOTE:
There are three (3) URLs that the user will need from Inspera to set up the LTI connection in your Blackboard instance. They are:
- key-url: a key-url typically refers to a set of public keys used for authentication and security purposes.
- login-init: When a user initiates a login process from LMS to an external tool using LTI 1.3, the "login-init" URL is the endpoint where this process begins.
-
redirect-url(s): The redirect URLs specify the URLs where LMS should redirect the user after completing the OAuth 2.0 authorization flow.
key-url https://{domain}/ICSXapi/metadata/PublicCertificates login-init https://{domain}/ltiprovider/init redirect-url(s) https://{domain}/ltiprovider/launch Using the URL templates above, replace {domain} with your Inspera tenancy that you will be setting up the integration against.
For example, if your Inspera tenancy has the URL, demo.inspera.com, then the URLs would be:
key-url https://demo.inspera.com/ICSXapi/metadata/PublicCertificates login-init https://demo.inspera.com/ltiprovider/init redirect-url(s) https://demo.inspera.com/ltiprovider/launch -
Enter the following details to register the application.
- Application Name: The unique name of the application.
- Description: Brief description of the tool.
-
Domain(s): Refers to the domain of the application's server or the URL where the application is hosted.
Note: The domain is used to specify the URL from which the application is allowed to be accessed. For e.g: demo.inspera.com
-
Group: Groups are tied to the email address. The admin can have as many groups as the user wants but only one production group. When we register an application, we need to specify a group to which the application belongs.
Note: Group here means a category that helps organize and manage applications within the Blackboard. Blackboard provides a Developer Portal where users can register their applications to integrate with Blackboard.
-
Turn on My Integration supports LTI 1.3 [i] toggle.
-
After Turning on the toggle, some fields are added to update the details.
Enter the configure settings for the LTI tool:
-
Login Initiation URL: Enter the Login Initiation URL.
-
Tool Redirect URLs: Redirect URL data should be provided by the tool provider.
-
Tool JWKS URL: Enter the tool JWKS URL
- Signing Algorithm: Signing algorithm should be selected as RS256 (by default).
- Custom Parameters: Add custom parameters, if any (Refer Custom Parameters).
Important: Make sure you have replaced {domain} with the URL to your Inspera tenancy. -
-
Now, click on the Register Application [i] button to register the application.
-
Administrator - View the Application within Blackboard Developer Portal
-
After registering an application, the screen should navigate to the secret key.
Note: Copy all these values to complete the configuration mentioned in sec 2.6.
-
Click on the Done button, the screen should navigate to My Applications.
Application ID: Application ID will be the client id and this client ID will be required at the time of registration.
-
-
Administrator - One of the ways to configure Manage Placements in Developer Portal
There are two ways to configure the placement:
- Through the Developer Portal (This section).
- Through Blackboard LMS (See section 2.5 Administrator - One of the ways to configure Manage Placements With Blackboard).
This is available for Administrators in Blackboard.
-
Click on the 3 dots [i] on My Application.
-
Now, Click on the Manage Placements [i].
Note: If a user lands on the screen for the first time, they will see the Register button and click on it. Else if there is any existing placement, click on the + [i] icon to register the placement.
-
Register a new placement with Type as Course content tool.
- Placement Name: The name of the placement.
- Description: Brief description of the placement.
-
Type: ‘Course content tool’ should be selected as Type from the dropdown.
- Allows grading: Indicates that the particular activity is designed to be graded, and instructors can assess and assign scores to students.
- Launch in new window: Allows a link or external tool to open in a separate browser window.
- Target link Url: This link will be the same as Tool redirect Url which has been entered while configuring the tool. https://{domain}/ltiprovider/launch
- Custom Parameters: Add custom parameters, if any (Refer Custom Parameters)
-
Click on the Register placement [i] button.
-
After Registering the placement, the screen should navigate to the Inspera Assessment Manage Placements.
-
Again, click on the + [i] icon on the same screen after registering the placement.
-
Now, Register a new placement with Type as Course tool.
- Placement Name: The name of the placement.
- Description: Brief description of the placement.
-
Type: ‘Course tool’ should be selected as Type from the dropdown.
- Allow students access: Students are permitted to access assignments and content within a course.
- Launch in new window: Allows a link or external tool to open in a separate browser window.
- Target link Url: This link will be the same as Tool redirect Url which has been entered while configuring the tool. https://{domain}/ltiprovider/launch
- Custom Parameters: Add custom parameters, if any (Refer Custom Parameters)
-
Click on the Register placement [i] button.
-
After Registering the placement, the screen should navigate to the Inspera Assessment Manage Placements.
-
-
Administrator - Configuring LTI Integration With Blackboard
To configure the integration between Inspera and Blackboard, the user must complete the following setup steps within Inspera and Blackboard.
This is available for Administrators in Blackboard.
-
To configure an LTI integration in Blackboard, select Admin [i] on the left panel.
-
Select LTI Tool Providers [i] from the Integrations section of the admin panel.
-
Click on the Register LTI 1.3/Advantage Tool [i].
-
Enter the client id [i] and click on the submit [ii] button.
-
On Clicking on the submit button, Accept LTI 1.3 Tool screen appears with all the pre-filled data.
-
Now set the Tool status as Approved and add a custom parameter if any (refer Custom Parameters).
Note: If the user sets Tool Status as Excluded, it means that the tool is not available or not allowed for use.
-
Check all the User Fields to Send and also, select the Yes services for Allow grade service access and Allow Membership Service Access.
- User Fields to Send: Ensures that the LTI tool receives the necessary information about the user accessing the tool from Blackboard.
- Allow grade service access: Enables the LTI tool to access and interact with Blackboard's grade-related services. This will be required to sync grading from Inspera to Blackboard.
- Allow Membership Service Access: Use this service to retrieve members' information as per privacy settings. This will be required to retrieve members' information.
-
Click on the submit button to register the LTI tool and it should be visible on the Administrator Tools.
-
-
Administrator - One of the ways to configure Manage Placements With Blackboard
There are two ways to configure the placement:
- Through the Developer Portal (See section 2.3 Administrator - One of the ways to configure Manage Placements in Developer Portal).
- Through Blackboard LMS (This section).
This is available for Administrators in Blackboard.
-
Click on the Options menu on Tool/Provider [i] i.e. Inspera-dev and click on Manage Placements [ii].
-
Now, click on Create Placement.
-
Fill all the mandatory details with Type as Course content tool with grading enabled.
Note: The user has the flexibility to create an activity without enabling the evaluation, expressing your preference for it not to be graded.
-
Click the submit button to register the placement.
-
Now, again click on the Options menu on Tool/Provider [i] i.e. Inspera-dev, and click on Manage Placements [ii].
-
Now, click on Create Placement.
-
Fill all the mandatory details with Type as Course tool with Allow student access enabled.
-
Click Submit to register the placement.
-
Administrator - Configuration of Inspera Assessment
Inspera will need the following information back from Blackboard. The user will need to contact Inspera Support to have them make these updates for your specific Inspera tenancy.
The specific Blackboard values are to be configured in Inspera to complete external tool configuration on both Blackboard and Inspera.
Client ID Unique for the tool that is created and can be found as part of the initial tool registration done in Blackboard Issuer/Platform https://blackboard.com tokenURl https://<blackboard-domain>/api/v1/gateway/oauth2/jwttoken OIDCUrl https://<blackboard-domain>/api/v1/gateway/oidcauth keyUrl https://<blackboard-domain>/api/v1/management/applications/c15afd6b-2611-43de-92a6-0f8aec057b86/jwks.json Deployment ID Unique ID Note: The ClientID is created through registration of the app on the Blackboard Developer Portal at https://developer.blackboard.com/
-
Teacher - Setting up a link in an Original Course view
2.7.1 Adding an Activity where Marks Return to Blackboard Gradebook
2.7.2 Adding an Activity where marks are NOT required to be returned to the Blackboard Gradebook
2.7.1 Adding an Activity where Marks Return to Blackboard Gradebook
The Blackboard integration with the Inspera Assessment can be set up to allow for marks from the Inspera Assessment to be returned to the Blackboard gradebook. In that scenario, the following steps should be followed:
- Login to Blackboard as an instructor
- Open the Original Course view course in which the user wishes to create the linkage to an assessment
-
Click Content [i] from the left-hand course menu, then click the dropdown beside the Build Content [ii] menu and select the LTI tool the user created i.e. ‘IA course Content Tool Grades Return’ [iii] in the Blackboard LTI tool setup.
-
Now, complete the following fields for this link.
- Name: Enter the name of the assessment the user wishes to create in Inspera.
- Description (optional): A description for this link
- Enable Evaluation: Choose “Yes”
-
Points Possible: Enter the total number of marks
Note: For consistent scoring, the instructor must establish identical total points on both Inspera and Blackboard. If a question set is created with 40 marks in Inspera, but in Blackboard, the assignment is set for 10 marks, and a student scores 27 out of 40 in Inspera, the student will see the marks as 27 in Inspera. However, in Blackboard, it will show as 6.75 marks with the maximum score as 10. The score is converted in the same ratio.
- Visible to Students: Select “Yes” for students to see this link in the course. Choose this option only after activating the test in Inspera.
- Options: This section remains the default.
- Permit Users to View this Content: Content is made accessible and viewable to users, such as students enrolled in the course.
- Track Number of Views: Blackboard will not track the number of views for that content.
- Select Date and Time Restrictions: It allows instructors to set specific time frames for the availability of course content, ensuring that students can only access within defined time intervals.
-
Click the Submit [i] button to save the changes.
-
After submitting, the screen should display as follows:
2.7.2 Adding an Activity where marks are NOT required to be returned to the Blackboard Gradebook
At times, it may not be a requirement to have marks from an Inspera Assessment returned to the Blackboard gradebook. In such a scenario, the following steps should be followed:
- Login to Blackboard as an instructor
- Open the Original Course view course in which the user wishes to create the linkage to an assessment
-
Click Content [i] from the left-hand course menu, then click the Tools [ii] dropdown and select the LTI tool the user created i.e. ‘Inspera-dev’ [iii] in the Blackboard LTI tool setup.
-
Now, complete the following fields for this link.
- Name: Enter the name of the assessment
- Text (optional): A description for this link
- Options: This section remains the default.
- Available: The content is made accessible and viewable to users, such as students enrolled in the course. Choose this option only after activating the test in Inspera.
- Track Number of Views: Blackboard will not track the number of views for that content.
- Select Date and Time Restrictions: It allows instructors to set specific time frames for the availability of course content, ensuring that students can only access within defined time intervals.
-
Click the Submit [i] button to save the change.
-
After submitting, the screen should display as follows:
-
Teacher - Setting up a link in an Ultra Course view
2.8.1 Adding an Activity where Marks Return to Blackboard Gradebook
2.8.2 Adding an Activity where Marks are not required to be returned to Blackboard Gradebook
2.8.1 Adding an Activity where Marks Return to Blackboard Gradebook
- Login to Blackboard as an instructor
- Open the Ultra Course view course in which the user wishes to create the linkage to an assessment.
-
Click the + [i] icon in the Course Content area and choose Content Market [ii].
-
Click on the + [i] icon to add the Inspera Assessment tool to the course.
-
Click on the arrow [i] icon to make the tool visible to students [ii]. Choose Visible to students option only after activating the test in Inspera.
-
Click on three dots [i] and click on the edit [ii].
-
Rename the title [i], select the Create grade book entry from this item box [ii], and in Maximum points [iii], enter the number of marks of this test.
Note: If a question set is created with 40 marks in Inspera, but in Blackboard, the activity is set for 10 marks, and a student scores 27 out of 40 in Inspera, the student will see the marks as 27 in Inspera. However, in Blackboard, it will show as 6.75 marks with a maximum score of 10. The score is converted using the same ratio.
Create gradebook entry from this item: A record associated with a specific assessment or activity that allows instructors to record and manage students' grades.
-
Click on the Save [i] button.
2.8.2 Adding an Activity where Marks are not required to be returned to Blackboard Gradebook
- Login to Blackboard as an instructor
- Open the Ultra Course view course in which the user wishes to create the linkage to an assessment.
-
Click the + [i] icon in the Course Content area and choose Content Market [ii].
-
Click on the + [i] icon to add the Inspera Assessment tool to the course.
-
Click on the arrow [i] icon to make the tool visible to students [ii].
-
Click on three dots [i] and click on the edit [ii].
-
Rename the title [i]. Choose Visible to students option only after activating the test in Inspera.
-
Click on the Save [i] button.
-
Teacher - Create Assessment
Login to Blackboard as an Instructor.
Click on the link the user created to open a new tab and launch Inspera Assessment. The user will be taken to the setup page for a new test. The name of the test the user created in Blackboard will be passed across into the Test name field in Inspera.
The Inspera Assessment test setup will open at the Deliver tab, and the user can set about configuring the appropriate settings for this test. Further instructions on this can be found at: https://support.inspera.com/hc/en-us/articles/4409221537425-Deliver-overview
-
Candidate – How to take an Inspera Assessment from Blackboard
Candidates can launch an Inspera Assessment from Blackboard and take scheduled tests set up by an instructor.
- Login to Blackboard as a candidate.
-
Click on the Course containing the link to your assessment, then click on the name of the assessment [i].
-
Assessment will launch in a new tab, the candidate will be redirected to the Inspera screen to attempt the scheduled test.
The Candidate takes the test and submits their answers at the end. The candidate can then log out of Inspera Assessment.
Once the test has been graded and marks confirmed by the grader, the candidate may be able to see their results on the candidate dashboard within the Inspera Assessment (based on the test settings) as well as in the Blackboard Gradebook.
Note: To enable displaying Marks/Results in Inspera Assessment, select option i.e. ‘Show Final Marks or Grades on Candidate Dashboard’ in the After test settings during the assessment setup process.
3. FAQ
- In such a case, the following steps should be followed:
-
When registering a new placement with the type set as 'Course Content Tool,' the user should enable the checkbox for 'Allows Grading' under 'Manage Placements.
Please refer to the pt. # (d) in section 2.5 Administrator - One of the ways to configure Manage Placements With Blackboard.
-
When configuring LTI integration, the user should select 'Yes' for the 'Allow Grade Service Access' radio button.
Please refer to the pt. # (g) in section 2.4 Administrator - Configuring LTI Integration With Blackboard.
-
While setting up a link in the Original Course View, go to the grading section and enable evaluation.
Please refer to the pt. # (d) in section 2.7 Setting up a link in an Original Course view.
- Please ensure that the test is graded in Inspera Assessment. The grading must be confirmed in order to facilitate the transfer of marks.
-
-
Revalidate LTI Configurations for both Blackboard and Inspera.
In BlackBoard, validate the tool configuration by editing the tool from the “LTI Tool Provider” under the Integrations section.
Recheck the accuracy of the following fields: Client ID, Initiate Login URL, Tool Redirect URLs, JWKS URL.
Ensure that these details are correctly configured to ensure seamless integration and functionality.
On Inspera the Service Desk will need to ensure the below details are configured properly:
-
Grades not migrated from Inspera to Blackboard via LTI after being confirmed the second time?
In such a case, the following steps should be followed:
-
When registering a new placement with the type set as 'Course Content Tool,' the user should enable the checkbox for 'Allows Grading' under 'Manage Placements.
Please refer to the pt. # (d) in section 2.5 Administrator - One of the ways to configure Manage Placements With Blackboard.
-
When configuring LTI integration, the user should select 'Yes' for the 'Allow Grade Service Access' radio button.
Please refer to the pt. # (g) in section 2.4 Administrator - Configuring LTI Integration With Blackboard.
-
While setting up a link in the Original Course View, go to the grading section and enable evaluation.
Please refer to the pt. # (d) in section 2.7 Setting up a link in an Original Course view.
- Please ensure that the test is graded in Inspera Assessment. The grading must be confirmed in order to facilitate the transfer of marks.
-
-
In such a case, the following steps should be followed:
-
When registering a new placement with the type set as 'Course Content Tool,' the user should enable the checkbox for 'Allows Grading' under 'Manage Placements.
Please refer to the pt. # (d) in section 2.3 Administrator - One of the ways to configure Manage Placements in Developer Portal
-
When configuring LTI integration, the user should select 'Yes' for the 'Allow Grade Service Access' radio button.
Please refer to the pt. # (g) in section 2.4 Administrator - Configuring LTI Integration With Blackboard.
-
While setting up a link in the Original Course View, go to the grading section and enable evaluation.
Please refer to the pt. # (d) in section 2.7 Setting up a link in an Original Course view.
- Please ensure that the test is graded in Inspera Assessment. The grading must be confirmed in order to facilitate the transfer of marks.
Note: If a question set is created with 40 marks in Inspera, but in Blackboard, the activity is set for 10 marks, and a student scores 27 out of 40 in Inspera, the student will see the marks as 27 in Inspera. However, in Blackboard, it will show as 6.75 marks with a maximum score as 10. We can consider the score converted in the same ratio.
-